09 September 2011

Christmas Card #6 - Last but not Least (and certainly the EASIEST!)

Last but not least - here is # 6 out of 6 cards I created for the Above & Beyond Christmas Card Swap at 2011 Convention. 

This one was certainly the EASIEST and, it uses the adorable new Mini Brads!

Here's what you'll need:
Petite Pairs stamp set; Early Espresso card stock (smooth & textured); Marina Mist card stock; Pink Pirouette card stock; Letters to Santa DSP; Riding Hood Red classic ink; Silver mini brads; Pretty in Pink satin ribbon;  Decorative Label punch; Scallop Oval punch; Large Oval punch; Scallop Edge Border punch; Stampin’ Dimensionals
 Here's what you do:
Cut DSP and layer onto Early Espresso smooth card front.  Cut textured Espresso 2x4-1/4” and scallop edge – adhere to DSP.  Tie ribbon around scalloped piece.  Punch Marina Mist with Deco Label punch.  Punch textured Early Espresso with Scallop punch.  Stamp Merry Christmas using Red Riding Hood ink on Pink Pirouette card stock and punch with Large Oval punch.  Assemble punched pieces and attach 2 silver mini brads.  Attach punched piece with stampin’ dimensionals.

Christmas Card Swap #5

Finally!  Here is card #5 out of 6.  Did you give up waiting for it?  This one was in my head when I saw this beautiful new bird in the New Catalog in July.  I'm so glad it came together so nicely! 

Here's what you need:
En Francais & Beautiful Season stamp sets; Early Espresso Craft Spot; Always Artichoke, Cherry Cobbler, Chocolate Chip, Crumb Cake, So Saffron Classic Inks; Aqua Painter; watercolor paper; Very Vanilla, Always Artichoke, Cherry Cobbler card stocks; Cherry Cobbler & Always Artichoke seam binding; Clear EP; Stampin’ Dimensionals


Here's what you do:

Stamp 2/3rds of Very Vanilla card with En Francais stamp using Always Artichoke ink.  Stamp Bird with Holly on watercolor paper using Espresso craft ink and emboss with Clear EP.  Paint using inks listed above and Aqua Painter.  Let dry.  Attach to Artichoke card stock.  Tieseam bindings to card.  Attach Artichoke piece.  Stamp Thinking of You on vanilla scrap using Artichoke ink.  Punch out using Deco Label punch.  Punch Cherry Cobbler CS using Deco Label punch.  Cut Cherry Cobbler punched piece in half, trimming off center points.  Attach to back of vanilla label, layering as desired.  Attach to card using stampin’ dimensionals.

15 August 2011

Christmas Card Swap #4

Here is card #4 out of 6.  Yep!  Only 2 more cards from the Christmas Swap after this one.

I don't know if you can see how glittery this one is, but it is GLITTERY!  Double-Click on the image to see the amazing glitter-y-ness better!  Its also very simple to do and doesn't use many supplies. 

What you'll need: 
Welcome Christmas, Scenic Season & Teeny Tiny Wishes stamp sets; Night of Navy card stock, classic ink; Glossy card stock; Multi Purpose Adhesive Sheets (MPA); 1-1/4” circle punch; Stampin’ Sponge; Dazzling Diamonds glitter; Powder Pals tray, post-it note
 
How to make it:

Stamp Glossy card front with Trees, Sled/Kids, and Merry Christmas using night of navy ink.  Let dry.  Punch out circle from post-it note and attach, covering moon and bird.  Sponge from bottom of trees up to top of card using night of navy ink.  Let dry.  Peel off post-it note.  Cut a piece of MPA to 4-1/4” x 5-1/2”.  Peel word liner off and attach to front of card.  Smooth using bone folder.  There will be sticky edges all the way around, just rub these with your finger and they’ll roll up and you can throw them away.  Place Dazzling Diamonds glitter in the Powder Pals small tray.  Peel remaining layer off of card front and dip in the glitter til covered.  Tap off and attach to night of navy piece.


09 August 2011

Christmas Card Swap #3

Here is card #3 from the Christmas Card swap I participated in at Convention.  You'll have to pull out your sewing machine, but its easy - just set your stitch guide to zig-zag (the zig-zaggier the better!) and stitch straight across the card!

Here are the supplies you need:

Merry & Type stamp set; Very Vanilla card stock; Cherry Cobbler classic ink, craft spot, card stock, EP, 1-1/4” striped grosgrain ribbon; Iridescent Ice EP; Silver Fox smooch; Basic Rhinestones; Sticky Strip

Here are the directions: 

Mix equal amounts of Iridescent Ice and Cherry Cobbler EPs in a stampin' store container. 

Stamp Ornament in Cherry Cobbler craft ink and emboss. 

Place a strip of sticky strip across top of very vanilla card front.  Place ends of 8” piece of Cherry Cobbler ribbon on edges of card.  Press ribbon down in various spots and then zigzag stitch ribbon to card. 

Stamp Merry & Bright on bottom corner of vanilla piece.  Adhere to Cherry Cobbler card. 

Paint ornament hangars with smooch and adhere rhinestone.

08 August 2011

Christmas Card Swap #2

Happy Santa Card
Here is the 2nd of my 6 cards for the Christmas Card swap I participated in at Convention.

Here are the supplies I used...

Jolliest Time of the Year & Short & Sweet  stamp sets; Real Red DSP (from Brights Stack); Basic Black card stock; watercolor paper; Black StazOn ink; Bashful Blue, Basic Gray & Real Red classic inks; Blush Blossom marker; Silver Fox smooch; Aqua Painter; 1/8” Basic Black taffeta ribbon; Big Shot; Top Note die; 2-way Glue Pen; Stampin’ Dimensionals

Here are the directions: 

Cut watercolor paper out using Top Note die. 

Stamp Santa & Very Merry on top note using Black StazOn ink. 

Paint using inks listed above and Aqua Painter.  Let dry. 

Paint belt buckle with silver smooch.  Let dry. 

Apply 2-way glue to trim and cover with dazzling diamonds. 

Attach Real Red to Black card front. 

Tie ribbon around card front. 

Attach top note to card using Stampin’ Dimensionals. 

07 August 2011

Christmas Card Swap #1


I participated in a wonderful Christmas Card organized swap at Convention.  I signed up for 6 groups and came home with 60 great card ideas!   I thought I would share each of my six cards with you.  Hope you enjoy them!

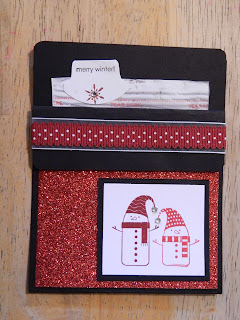
This is an oldie but a goodie - a twist on a Library Pocket Card.  You can also use a piece of cardstock as the insert, or a soup packet, or anything you like!

Fold 4-1/4” x 11” Basic Black card stock in half.  Score one end at 1-1/4”.  Fold. 

Attach 4x4 piece of glimmer paper to card front bottom. 

Attach ribbons to small fold, attaching on backside. 

Staple card shut or use sticky strip to hold closed at top.


Attach a row of stampin’ dimensionals to underside of flap, peel off liners and apply a line of sticky strip.  Press firmly. 

Punch out round tab from white CS and stamp with merry winter in black and a single snowflake from Serene Snowflake set in cherry cobbler. 

Attach to hot chocolate packet. 

Stamp snowmen from Merry Winter in cherry cobbler and real red on white piece.  Attach to black layer and attach to card using sticky strip.  Adhere rhinestones.

06 August 2011

Happy Birthday Nautical Card

Happy Birthday Nautical Card
I created this card based on the design of Mary Ellen Byler in her class at Convention.  I changed it up a bit. 

Cut out one of the larger of two scalloped squares on the Scalloped Squares Bigx Die using White Naturals cardstock. 

Stamp "Happy Birthday" from the Perfectly Penned set and the Ship from The Open Sea set using Not Quite Navy ink. 

Ink up Wonderfully Worn background stamp with Not Quite Navy and stamp square and White Naturals card. 

Stamp Ship's Log and World Map images from The Open Sea on the card in Not Quite Navy.

Cut a piece of Nautical Expedition DSP (4-1/8" x 2-3/4") and tear sides. 

Sponge square, DSP torn edges and card using Not Quite Navy. 

Stamp compass on DSP and White Naturals scrap.  Punch from scrap using 1" Circle Punch.  Pierce center and add a Mini Brad. 

Attach DSP to card and attach compass to DSP using Stampin' Dimensionals. 

Cut a 3-1/4" square piece of Cherry Cobbler and attach Scalloped Square to that. 

Wrap Cherry Cobbler Baker's Twine around card and tie in knot.  Attach Cherry Cobbler piece to card front using Stampin' Dimensionals. 

Everything used in this card is available in the New Idea Book and Catalog, EXCEPT FOR: The Open Sea & Nautical Expedition DSP.  They are shown in the Summer Mini - you have til the end of August to order these and many other items.  Click on the link at the left to be taken to my website where you can order any of Stampin' Up!'s many wonderful products!

03 February 2011

Sale-A-Brate an extra value for becoming a Stampin' Up! Demonstrator!!

Become a Stampin' Up! Demonstrator for only $148!!!  + special Bonus Bundle!!

As noted on the back of the Sale-A-Bration brochure, any new demonstrator who joins during Sale-A-Bration will not only receive 15 percent off their Starter Kit, but will also receive a special Bonus Bundle of products valued up to $50! The following items will be included in a new Demonstrator's Starter Kit (whether it's the standard kit or the Digital+ Starter Kit):


Here are a few more reasons to join:

•Fill your Wish List! Imagine this! Save 30% on your first product order of $150 or more (placed within 45 days), plus earn hostess rewards & receive a minimum of three Sale-A-Bration gifts (1 for every $50 in product purchased). Yes, us demo's get the same perks as you plus more!

•Take a Demo Test Drive! Enjoy Stampin' Up! Demonstrator discounts and benefits through June 30, 2011 with NO further need to sell or purchase any products beyond the starter kit.

•You'll get access to Stampin' Up!'s awesome Demo website!  Always full of great ideas and techniques, the demo website keeps you up-to-date on specials, product information, upcoming events and more!

•Each month you'll receive a copy of Stampin' Up!'s demonstrator-only magazine "Stampin' Success".  This full-color magazine also has great stamping ideas as well as important demonstrator info!

These are just a few of the reasons to become a Stampin' Up! demonstrator!

E-mail me for more information or the special code to just sign up on my website here: